20 May, 2022

How to insert a file path and file name into Word 2007?


How to Insert a file path and file name into Word 2007? 

the steps of inserting the file path in the footer are different, let's find out 

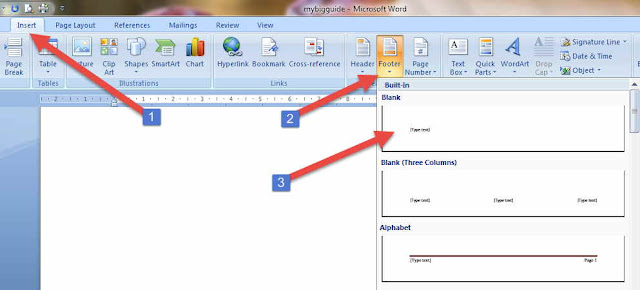
  • You can insert a path in any new or old file so, you click on the Insert tab.
  • Here go to the Header and Footer area. Here Choose Footer and select Blank.


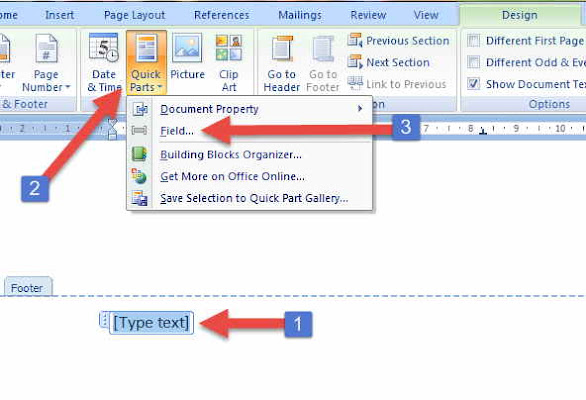
  • When you select Blank, Blank Field will become a footer on the page. In Which Type of text will be written. You can type anything here whatever you want. 
  • But we have to set an automatic file path here. So, click on this Blank Field with the mouse, and the Design tab will appear in the ribbon, here Quick Parts will appear, click on this, and now select the field from the menu. 

  • A window will open as you select the field, where you have to choose Document Information from the Categories dropdown menu. Also, the file name has to be chosen from the box given below.
  • After this tick, the check box is given in the field options Add path to the filename. 


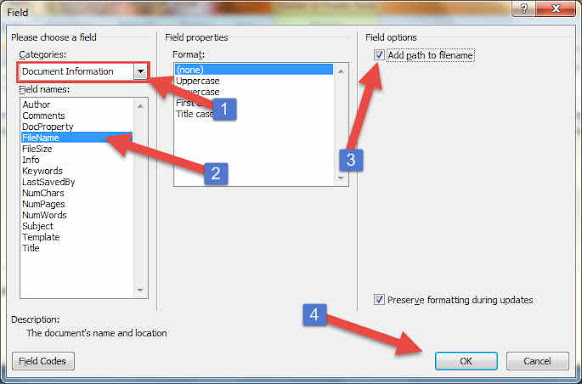
  • Then tick OK, this is how you can insert the file path in the footer in Word 2007. It looks like this below


  • After this, keep this file anywhere, the path of that place will automatically change and you will see it in the footer.

06 May, 2022

How To Use SUM formula in MS Word


How To Use SUM Formula in MS Word?

SUM in the table in MS WORD, AVERAGE, COUNT, MAX, MIN formula can also be used, let's know how to apply SUM formula in MS WORD also Super Tips.

  • Click on the cell in whichever table you like to apply the SUM formula.
  • Now press Ctrl + F9 from the keyboard
  • By doing this, {} Bracket will come in that cell-like this 
  • Now in the middle of these {} brackets you have to type the SUM formula, something like this 
  • If you like to SUM from top to bottom then you have to type =SUM(ABOVE) 
  • Thus if you like to SUM from top to bottom then type =SUM(BELOW)
  • And if you like to SUM the row given on the left then type =SUM(LEFT)
  • If you keep any changes in the table after doing SUM, then the formula is not updated automatically like in Excel. To update the formula, you need to right-click on the cell containing the SUM and choose the Update field or Ctrl + F9 from the keyboard. Have to press, even this gets the Formula Updated 
  • Like LEFT, RIGHT, ABOVE, BELOW are used with SUM formula, MS WORD you can also use AVERAGE, COUNT, MAX, MIN, PRODUCT, SUM with LEFT, RIGHT, ABOVE, BELOW.

How to convert Text To Table and Table To Text?


How to convert Text To Table and Table To Text?


Text To Table:-
  • Choose whatever text you like to convert to the table in ms word and 
  • Click on Insert Menu Go to Table 
  • Here you will see the option of Convert Text to Table, click on it

Table To Text:- 

  1. Choose any table you like to convert the text into ms word 
  2. Click on Layout in Table Tools Go to Table 
  3. Here you will see the option of Convert to Text, click on it

How to Use New Rupee Symbol in Excel and Word


How to Use New Rupee Symbol in Excel and Word-(Indian/Nepali) currency


  • First of all, you download the update of Microsoft, which supports the new currency symbol of the Indian/Nepali Rupee, after the update is downloaded, install it on the computer and restart the computer. 
  • Now open the Control Panel and click on Clock, Language, and Region, here click on Change keyboards or other input methods 
  • Here go to the Keyboards and Languages ​​tab and click on the Change keyboard, here you will see the Add button, click on it, and now you will see all the input languages, here select English (India)/ Nepali (Nepali) and click OK
Now Open MS Word and use the Keyboard shortcut given below 
  • Ctrl + Alt + ₹
  • Ctrl + Alt + 4
  • Alt 8377
  • 20B9 = Alt +x

Microsoft Word User Interface


Microsoft Word User Interface:-

When you open MS Word for the first time, then you see this type of User Interface, let's understand them. 

  1. Title Bar: The title bar is the topmost part of MS Word, where the name of the document is Saw, until you save the file, you will see Document 1 and when you save the file, you will see File the name will appear 
  2. The menu bar: is just below the title bar, in which different menus are open according to different groups, currently, the menu bar has been converted into a ribbon in which different tabs have been made in which Home Tab, Insert Tab, Page Layout Tab, References Tab, Mailings Tab, Review Tab, View Tab are given in which all the tools of Word Processor are given. 
  3. Ruler Bar: Vertical and Horizontal Ruler is given in MS Word, which shows the length and width of the page, if you want, it can also be hidden. 
  4. To move the scroll bar page up, down and to the right, this tool has been given in MS Word, so that you can use it with the help of the mouse or with the help of the arrow key of the keyboard. 
  5. Status Bar: This is the lower part of the screen in which all the information related to the document is visible like Page Number, Number of Lines, and Number of Columns. 
  6. Writing Area In MS Word this area is visible in white color where you can type anything it is also called a page by default when you create a new file for the first time its size is the letter 
  7. Mouse Pointer / Cursor MS Word When you move the Mouse Pointer on the page, it becomes in the shape of a large eye (I) which is the Insertion Point at the beginning of the page which is also called the Cursor. Typing will be at the place and will start from there 

How to Upgrade from windows 7 to windows 10?

 How to Upgrade from windows 7 to windows 10?

  If you need to upgrade from Windows 7 or Windows 8 to Windows 10 but the Windows  10    Upgrade icon is still not visible in your taskbar, then follow this process-  

  • For this, you keep downloading Windows 10 first. 
  • For which you keep to go to  Windows 10 Download Center
  • Where you will get an option to download Windows 10 through Media Creation Tool. 
  • Here are two choices to download the Media Creation Tool 32-bit and 64-bit Now you keep to find out whether your Windows is 32-bit or 64-bit. So just right-click on the icon of my computer with the mouse and go to properties. Here you will see in the system type whether your system is 32-bit or 64-bit. 

  • After finding out, download the Media Creation Tool of the same bit. 
  • After downloading the Media Creation Tool, run it. 
  • Here you will see two choices- 
  • 1- Upgrade this PC now and 2- create installation media for another PC
  • If you like to update your computer directly then 

  • Tick ​​on Upgrade this PC now and click on Next. 
  • Your Windows 10 will start downloading.

  • Now let's talk about the second choice, create installation media for another PC, if you like to write Windows 10 to USB or DVD disc, then click on it. 
  • Here you will see the option of language and edition - 
  • Windows 10's 5 editions have been launched, you can download whichever one you like, after that click on Next. 
  • Here you will see two choices, if you want to download Windows 10 on the USB drive, then select the first one, for this you must have at least 3GB of space in your USB drive. 

  • And if you like to write Windows 10 to DVD, then choose the second choice. This will create an ISO file of Windows 10 so that you can burn DVDs later. 
  • furthermore thing, this download of Windows 10 is 3GB,  you must have a good internet speed and time to download it through Media Creation Tool. 

How to Translate from Bing offline?

 How to Translate from Bing offline?


Microsoft has made a new translator for Windows 8, its name is Microsoft Bing. Translator which translates online as well as offline, let's know about it -


  • Bing Translator supports only 40 languages ​​as compared to Google. 
  • Its offline version supports only Windows 8.
  • To use in the browser , you have to use the online version only. It works on any Windows. Just like Google Translator  .
  • If you have Windows Phone, Teblet   , then you can translate any poster or sign board by taking a photo 
  • Apart from this, you can  type to translate .
  • Another great feature of this is if you share a paragraph or post on Facebook or any other site or by email, then you can directly share it in your language . 
  • If you are sending a scanned document by email to someone, then you can also translate it, with Bing. a Translator
  • If you have Windows 8 then you can download its offline version , for which you will have to download different language packs.

How to Use Your Pendrive As Your Computer Password

How to Use Your Pendrive As Your Computer Password?

  • Plug your pen drive into the computer. 
  • Now open the Control Panel. 
  • Open Administrative Tools. 
  • Find and open Computer Management in Administrative Tools. 
  • After opening the Computer Management window, click on Disk Management under Storage, whatever window will open.


  • Now right-click on your pen drive, and click on Change Drive Letter and Path. 
  • Now Change Drive Letter and Path will open here your pen drive will be shown, now select it and click on Change. 
  • Another new window will open, here the choice of Assing the following drive letter will come, select letter A from the list of letters A to Z, and click on OK0. Now whatever will be the name of your USB drive, will be changed to Removable Disk (A:).


  • Now click on the start button and open the run command or press the Windows key + R, this will open the run command. 
  • Now type SYSKEY. 
  • This will open the Securing the Windows Account Database window. 
  • Click on the Update button here. 
  • On clicking Update, the option of StartupKey will come.
  • Hereunder System Generated Password, tick the Store Startup Key on Floppy Disk and click on OK.


Your Pendrive as Password is just ready. Now until your pen drive is not installed on your computer then your computer will not open.


If you want to restore this system, just 

  • Reopen the Securing the Windows Account Database window.
  • Click on the Update button here and go to the option of StartupKey.
  • Here instead of Store Startup Key on Floppy Disk under System Generated Password, tick Store Startup Key Locally and click on OK.